Visit London Without connecting Flights!

26 Oct

Hey everyone!! BIG NEWS!!  I have been getting a really positive response from reader in all FOUR of my blogs!!  Didn’t know I had four blogs?  Well, I most certainly do…

1.) Beauty and More

2.) Fitness and More

3.) Weddings and More

and finally…

4.) DIY and More


Well, this Miss Moore is COMBINING ALL of her blogs INTO ONE!!  Tracking who visits where- I saw lots of people starting out in DIY and hoping over to Beauty and then tracing back to Fitness, and so on…  And while that is great for me [so glad you all enjoy my posts!], and great for you [so glad you come back for MORE!]; I want to make it less of a hassle for my readers.  I have a couple readers who subscribed to multiple blogs- and that is just a lot of e-mail to get every time a new blog has a new post!!


So, no need to hope all over the place connecting from one blog to the next just trying to get to the London page that you like…  ALL blogs will be incorporated on

London Moore: Beauty and More!!

While being a makeup artist is one of my biggest passions- beauty can extend so far from just cosmetics!  Creating a body that you feel beautiful in; finding secrets and inspiration to make a beautiful day out of tying the knot; and putting together do-it-yourself projects that you can be proud of for making your life beautiful on your own terms!!


So, I am going to be leaving these blogs behind [perhaps not forever- but indefinitely], and you can find all of your London Moore interests on:

LondonMooreBeauty.Wordpress.com

Check out the blog, and although it may be JUST beauty now- it is going to start evolving into all the areas of interest!!

By subscribing to the blog- the first thing you’ll receive is my “For Subscribers Eyes ONLY: TOP 10 Beauty Tips from London & Back“.  You’ll learn tips to keep you at your most beautiful self long term, and short term quick fixes for the beauty “to-go” orders.  It pays off to be a subscriber!!

xxox

London

Halloween Ideas 2011: “SPOOKY” Wreath Home Decor

17 Oct
Halloween Ideas for 2011

As Spooky As I Get…

I am so not the person you would ever find running though the haunted house!!  In fact when I was in 4th grade, my best friend whose birthday is in October, went to Fright Mare on Market Street here in San Diego and took a small group of friends.  Well, I had never been in a haunted house before and I had no idea what to expect…  Ha, well- to briefly put it: I was not welcomed back to Fright Mare because half way through I ran out of my shoe, ran back to get it, and was so frightened by a chainsaw guy that I picked up my shoe and threw it at him!!  Then I bolted for my life…  I only got my shoe back when my friends dad met us at the exit & went back in to get my shoe from Mr. Chainsaw Man…  From then on, as spooky as I get is Disneyland’s version of Halloween!!

Supplies for DIY Home Decor:

Foam Wreath (Hobby Lobby or Michaels)
Yarn (Jo Ann’s Fabric or Michaels)
Lace (Jo Ann’s Fabric)
Flowers (Handmade)
Spanish Moss (from Dolllar Tree or Michaels)
Black Bird (from Dollar Tree)
Spooky Sign (from Hobby Lobby)
Tacky Glue (Michaels)

How To DIY:

1. Glue one end of yarn to the wreath and wrap the yarn ALL the way around the foam wreath…yup keep going!! Once you reach the end tack it down with a little glue.

2. Wrap lace around back of the wreath and tack it down with tacky glue.

3. Add some hand made flowers for a fun little touch.

4. Glue Spanish Moss on top of the lace seam. Just a warning…this stuff gets pretty messy! 😉

5. Glue black bird on top of Spanish moss.

Optional: Glue spooky sign to the top of the wreath.

And of course your end product is something cute & spooooky!!  Well, as spooky as I, London Moore, will ever get!! :]
Thanks to I {Heart} Naptime!

The DIY Network Strikes Again: Creating an Anthropologie Wedding with DIY Home Projects for the Thrifty Bride

16 Oct

The Amazing World of the DIY Netwrok:

I don’t know if the “do-it-yourself” world has just exploded over the past 5 years because Internet is now involved, or because the economy tanked, or maybe just because now I am a newly wed who is living pay check to pay check and DIY projects is what is making my life beautiful for 1/4 of the coast…

Well, whatever the reasons- thank goodness for the DIY NETWORK!!  There is nothing like creating your own DIY wall art, DIY wedding, or DIY home decor and seeing it be passed on!!  That is the beauty of do it yourself- you’re helping others colour their lives in a completely do-able way!!  Maybe solving world hunger on your own could be a bit tricky- but this is more than manageable & it helps so many people!!
DIY Home Decor & MICHAELS, MICHAELS, MICHAELS Errands :

So, October is crazzy for us!!  We have zillions of birthdays, pumpkin patch fiestas, Halloween itself, and whatever friends/family/work extracurricular activities in between…  So, although I have been doing diy home projects up the wazoo recently [for all those birthdays!!], it is nice to sometimes pass on other people’s brilliance!!  Plus, if I do one more run to Michael’s for more supplies I swear- in my dreams all I will be seeing is “MICHAELS MICHAELS MICHAELS”!!  So, in passing on others: I stumbled across 346 Living, which is mainly a blog about DIY home decor!!  This cute couple is redoing their house- and step by step they are sharing with us all of their diy home secrets!!

DIY Anthropologie Wedding or DIY Wall Art:

The highest compliment I received about my wedding decor was that it looked like “an Anthroplogie wedding”!!  For 2 years I collected thrift shop items, did diy wedding projects day and night, and again- Michaels Michaels Michaels is all I dreamt about!!  Now, Anthropologie is amazing in stores!!!  You walk in and tea cups are hanging off of the wall creating a HUGE letter “T”… Vintage books are crawling up the wall and onto the ceiling… And plastic cups don’t look trashy and cheap- they give a wall life and dimension!!  all of their own in house DIY “home” decor is cheap to do- plastic cups, old books from flea markets….  But what they sell is pretty pricey!!  If it weren’t for wedding registries- our home wouldn’t own one single gorgeous anthro piece….


SO- one more easy to do diy wedding or diy home decor project to put under your belt are the Zinc Letters Anthropologie sells for $18 a pop!  Simplistic, neat, and yet puts a beautiful spin on any shelf top in your master bedroom or elegant touch to your cake table!

ABOVE: Anthropologie Zinc Letters

Now onto our DIY Wall Art or Wedding decor!!

Use a metallic spray paint to thickly cover a cardboard letter- either from Jo Ann Fabrics or Michaels!

Ha- You’re done!! How simply awesome is that?!

If you want a more rustic golden finish- use 2 different kind of spray paint- a more dirty golden [somehwhat bronze-coppery colour] and a pure gold!!

Thanks to 346 Living for sharing their beautiful Anthropologie spin-off!!

So, how are YOU going to use these letters?  Maybe on your gift table at the wedding reception, as book ends in your home, or maybe a gift for a baby shower [would make really cute decor for a babies room!!].  Let us know what you are going to do with these wonderfully simple, yet gorgeous “ZINC” Letter!!!

TuTus: The Bread & Butter of Costumes!!

13 Oct

mmMMMMmmm… It is FALL!!  I love Fall- everything about it!!  The leaves, the trees, the colours, the wind and rain.  And all the holidays that fall within these couple of glorious months!!

First on the list: OCTOBER

[Little Red Riding Hood]

Halloween is one of my FAVOURITE holidays!!  I jump on ANY chance to dress up- and sometimes dress up requires no justification with me!!  However, Halloween can be such an expensive holiday!!  Adult costumes are anywhere between $30 – $100, and that is for something you buy at Party City or where ever… WHICH MEANS you know that you’ll bump into at least 5 other people wearing your costume- and as Miranda says in SEX IN THE CITY MOVIE:

MIRANDA:  That's it. The only two choices
for women, witch and sexy kitten.

CARRIE: You just said a mouthful there, sister.

And then you’ve got your little ones to dress as well…  And hopefully they aren’t dying to buy the $60 Hannah Montana costume with wig sold separately… So, I decided that I’d display the tutu I am making for my niece.  She is an October-baby and my sisters and I are creating a dress-up chest for her!!  I’ve been slaving away with my flat covered in pink and purple ribbon, beads, tulle, ect…  So here is a quick tutorial on how to create a TUTU!!

Measure out the size of your princess [or prince’s- whatever, no judgement!!] waist.  You are using elastic so going about 2in. shorter is the best because that way it’ll sit snug on their cute little waist!!

Take your tulle and cut out stripes– 2in. in width and height depends on the size of your cutie- as well as how long of short you want your tutu to be! [I did about 20 in.]   I used purple just for show because the pink was difficult to see…

Take your elastic and clamp down on either side of an ironing board so that you can work easily!  If you don’t have a clamp or anything big enough to fit around an ironing board- GET CREATIVE!! I used refrigerator claws and clamped them onto my squashy couch… Ha- you gotta do what you gotta do…

Take a strip of tulle and fold it in half- cross the bottom so that a loop is created at the top.

It may be difficult to see- however, pull the bottom pieces around the back of the elastic and pull through the loop.

This is what you should end up with:

Pull down and tighten the knot at the top- it should become as scrunched as possible!!

Repeat this tying process until your entire elastic band is fully covered.

Where all the gaps are that show the elastic- move the other knots closer so no white elastic is showing.

– – – – – – – – – – 

Once your tutu is FULL- you can either sew the elastic to either side OR sew ribbon on either side and make it so that a bow can be tied– just for an extra precaution [in case they grow evven bigger in the blink of an eye… it all happens so fast!!]

Add whatever you wish to decorate your tutu!!

Tutu’s are PHENOMENAL because they literally can be whatever you wish them to be- here are some ideas:

Scarecrow Tutu

Little Pumpkin Tutu

Sweet Ladybug Tutu

Rustic Tin Can Table Numbers

5 Oct

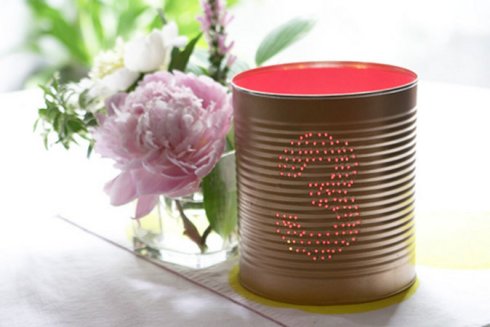
I love rustic looking decor!! Whether you use it for a wedding or for an outdoor bqq- that part is completely up to you!! I am just passing along the easy and fun to do project that 100 Layer Cake brought to my attention!!

Here’s what you need to get started. The tin cans (obviously). We suggest stopping by a local restaurant and asking if they have any empty tin cans they could part with. Just tell them you want them for your garden or something… no need to go into the whole story, you know? The nice thing about commercial cans is that they’re way bigger than regular soup cans from the store.

Step 1: Tape off the inside of your cans so no spray paint gets inside. Spray the outside of each can with the gold spray paint (or any color you like). Be sure you don’t hold the spray can nozzle too close to the tin can, which can make for drippy, runny lines down your pretty table numbers and no one wants that.

You may need to do two or three coats depending on how opaque you want to the color to be.


Step 2: Once your cans are dry, wrap your printed number stencil around each tin can.


Step 3: Drill. Yay! Start by drilling the outline of the number first (following the stencil line), and then work your way in. It certainly doesn’t have to be perfect, but the more holes you can drill, the more light your can will give off.


Step 4: Slide your colored paper into the can on the opposite side as the number. Mark the paper with the appropriate height and width (you don’t want it to cover your numbers. Next trim the paper to the correct size using your cutting mat and exacto.

Step 5: Spray mount the trimmed paper to the inside of your can (opposite the number). And you’re done! We used red paper but you can of course use whatever color you like. If you’re using a color you’re not sure about, consider doing a test can first and lighting it that night to make sure you like the look before you finish the rest of your numbers.

A Headboard You Don’t Want to Break!!

29 Sep

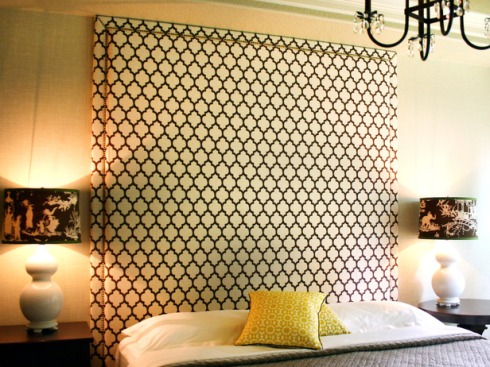
A way to dress up your bedroom without paying an arm and a leg- is to create your own masterpiece!! Headboard can be SOOO expensive!!  And yet there is a reason why- people love to have something so beautiful & unique that they are willing to pay!!  Well, pay no more!!

The DIY network came out with a cool way to creating a beautifully unique headboard- and it is so unique because you can take whatever fabric that flows with your bedroom decor & then put whatever you’d like on top of it.  Maybe a big letter for your last name… Maybe assorted picture frames with no glass & just showing the fabric- but a different flower painted on the fabric inside the frame… I don’t know!! Go crazy with it!!  But here is what DIY Netwrok tells you to do:

  • Determine Headboard Size and Cut Fabric
  • Sew Fabric Together
  • Cut Panels and Iron
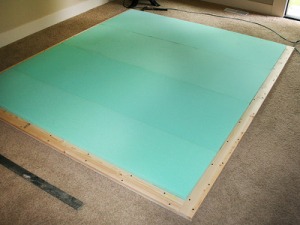
  • Construct Headboard Frame
  • Line Frame With Foam
  • Cover Foam With Batting
  • Cover Batting With Fabric
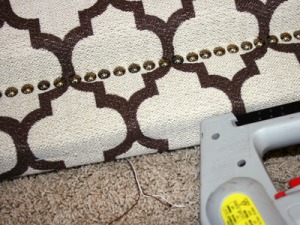
  • Tuck Edges and Secure With Nail Head Trim
  • Glue Fabric to Frame
  • Create Finished Corners
  • Staple Fabric to Frame
  • Turn Fabric Over and Attach Fabric to Back
  • Attach to Wall

apply heavy-duty adhesive to the back of the headboard. they put it up against the way using a sheet of plywood & two 2x4s.  I wouldn’t say that is exactly what you have to do… but if you want to get technical- go for it!!  Let it adhere to the wall for 48 hours before putting the bed against it.  And you are doooone!!

the fanciest chalkboard you’ve ever seen

28 Sep

Every home needs a memo board!! Not all homes have them– but whether you are rooming with 6 girls, a husband, or your kids; everyone needs a memo board!!  Now anyone can go out and pay for an overpriced fabric board with ribbon on it, or even spend more money to get a nice chalk board that actually looks beautiful and is functional!  

But why bother?! Just create the thing yourself!!  In my wedding in July I had about 6 chalkboards all over the venue & they were gorgeous!!  Some gave instructions, another was my ceremony program, and then some were signs pointing towards the photobooth.  They are all up in my home now!! And mine currently is reminding my husband that we need to pick up some turtle food…  And he wrote back: “got it babe!”

Song of Style blog gives a cute little how to, although they did it differently than how I made mine…

http://songofstyle.blogspot.com/2011/08/super-easy-chalkboard-diy.html

So the way they went about creating the chalkboard was to take a frame [a gorgeous frame at that!!] and saw a cut-out of the center of the frame.  Then they put a prime on it- and then the paint that creates the chalkboard texture.  

BUUUUT… I did mine in [what I think] was a way that makes it much easier on the DIY-er!!  I’m all about the same look, but with less and easier steps!!  

For MY diy chalkboard mirror:

-buy a cute picture frame

-take the glass out of the back and clean it

-get chalkboard spray paint [sold at Michaels & maybe even WalMart] and spray the glass pane

-then paint the picture frame if you want it in a different colour

-wait for both to dry, reassemble them, and then have fun with the chalk!!!

[frame from Michael’s]

[frame from Michael’s]

This mirror was a HORRIBLE and gaudy gold colour….  I was going to make it a chalkboard/memo-board… but I loved it as a mirror [after I painted it that is] so I kept it as such.

[mirror from Big Lots]

Easy as that!

No saw, no primer,

just easy-peasy beautifulness!! 

So go out and try to recreate this functional piece of art!! Comment back and let me know how it goes!!